Tracing Leaks in Python: Find the Nearest Root

By Chad Austin


Garbage Collection Doesn’t Mean You Can Ignore Memory Altogether…

Garbage collection removes a great deal of burden from programming. In fact, garbage collection is a critical language feature for all languages where abstractions such as functional closures or coroutines are common, as they frequently create reference cycles.

IMVU is a mix of C++ and Python. The C++ code generally consists of small, cohesive objects with a clear ownership chain. An Avatar SceneObject owns a ModelInstance which owns a set of Meshes which own Materials which own Textures and so on… Since there are no cycles in this object graph, reference-counting with shared_ptr suffices.

The Python code, however, is full of messy object cycles. An asynchronous operation may hold a reference to a Room, while the Room may be holding a reference to the asynchronous operation. Often two related objects will be listening for events from the other. While Python’s garbage collector will happily take care of cycles, it’s still possible to leak objects.

Imagine these scenarios:

  • a leaked or living C++ object has a strong reference to a Python object.
  • a global cache has a reference to an instance’s bound method, which implicitly contains a reference to the instance.
  • two objects with __del__ methods participate in a cycle with each other, and Python refuses to decide which should destruct first

To detect these types of memory leaks, we use a LifeTimeMonitor utility:

a = SomeObject()
lm = LifeTimeMonitor(a)
del a
lm.assertDead() # succeeds

b = SomeObject()
lm = LifeTimeMonitor(b)
lm.assertDead() # raises ObjectNotDead

We use LifeTimeMonitor’s assertDead facility at key events, such as when a user closes a dialog box or 3D window. Take 3D windows as an example. Since they’re the root of an entire object subgraph, we would hate to inadvertently leak them. LifeTimeMonitor’s assertDead prevents us from introducing an object leak.

It’s good to know that an object leaked, but how can you determine why it can’t be collected?

Python’s Garbage Collection Algorithm

Let’s go over the basics of automatic garbage collection. In a garbage-collected system there are objects and objects can reference each other. Some objects are roots; that is, if an object is referenced by a root, it cannot be collected. Example roots are the stacks of live threads and the global module list. The graph formed by objects and their references is the object graph.

In SpiderMonkey, Mozilla’s JavaScript engine, the root set is explicitly-managed. SpiderMonkey’s GC traverses the object graph from the root set. If the GC does not reach an object, that object is destroyed. If C code creates a root object but fails to add it to the root set, it risks the GC deallocating the object while it’s still in use.

In Python however, the root set is implicit. All Python objects are ref-counted, and any that can refer to other objects — and potentially participate in an object cycle — are added to a global list upon construction. Each GC-tracked object can be queried for its referents. Python’s root set is implicit because anyone can create a root simply by incrementing an object’s refcount.

Since Python’s root set is implicit, its garbage collection algorithm differs slightly from SpiderMonkey’s. Python begins by setting GCRefs(o) to CurrentRefCount(o) for each GC-tracked PyObject o. Then it traverses all referents r of all GC-tracked PyObjects and subtracts 1 from GCRefs(r). Then, if GCRefs(o) is nonzero, o is an unknown reference, and thus a root. Python traverses the now-known root set and increments GCRefs(o) for any traversed objects. If any object o remains where GCRefs(o) == 0, that object is unreachable and thus collectible.

Finding a Path From the Nearest Root to the Leaked Object

Now that we know how Python’s garbage collector works, we can ask it for its set of roots by calculating GCRefs(o) for all objects o in gc.get_objects(). Then we perform a breadth-first-search from the root set to the leaked object. If the root set directly or indirectly refers to the leaked object, we return the path our search took.

Sounds simple, but there’s a catch! Imagine that the search function has signature:

PyObject* findPathToNearestRoot(PyObject* leakedObject);

leakedObject is a reference (incremented within Python’s function-call machinery itself) to the leaked object, making leakedObject a root!

To work around this, change findPathToNearestRoot so it accepts a singleton list containing a reference to the leaked object. findPathToNearestRoot can borrow that reference and clear the list, ensuring that leakedObject has no untracked references.

findPathToNearestRoot will find paths to expected Python roots like thread entry points and module objects. But, since it directly mirrors the behavior of Python’s GC, it will also find paths to leaked C references! Obviously, it can’t directly point you to the C code that leaked the reference, but the reference path should be enough of a clue to figure it out.

The Code

template<typename ArgType>
void traverse(PyObject* o, int (*visit)(PyObject* visitee, ArgType* arg), ArgType* arg) {
    if (Py_TYPE(o)->tp_traverse) {
        Py_TYPE(o)->tp_traverse(o, (visitproc)visit, arg);
    }
}

typedef std::map<PyObject*, int> GCRefs;

static int subtractKnownReferences(PyObject* visitee, GCRefs* gcrefs) {
    if (gcrefs->count(visitee)) {
        Assert(PyObject_IS_GC(visitee));
        --(*gcrefs)[visitee];
    }
    return 0;
}

typedef int Backlink; // -1 = none

typedef std::vector< std::pair<Backlink, PyObject*> > ReferenceList;
struct Referents {
    std::set<PyObject*>& seen;
    Backlink backlink;
    ReferenceList& referenceList;
};

static int addReferents(PyObject* visitee, Referents* referents) {
    if (!referents->seen.count(visitee) && PyObject_IS_GC(visitee)) {
        referents->referenceList.push_back(std::make_pair(referents->backlink, visitee));
    }
    return 0;
}

static Backlink findNextLevel(
    std::vector<PyObject*>& chain,
    const ReferenceList& roots,
    PyObject* goal,
    std::set<PyObject*>& seen
) {
    if (roots.empty()) {
        return -1;
    }

    for (size_t i = 0; i < roots.size(); ++i) {
        if (roots[i].first != -1) {
            if (goal == roots[i].second) {
                chain.push_back(goal);
                return roots[i].first;
            }
            seen.insert(roots[i].second);
        }
    }

    ReferenceList nextLevel;
    for (size_t i = 0; i < roots.size(); ++i) {
        Referents referents = {seen, i, nextLevel};
        traverse(roots[i].second, &addReferents, &referents);
    }

    Backlink backlink = findNextLevel(chain, nextLevel, goal, seen);
    if (backlink == -1) {
        return -1;
    }

    chain.push_back(roots[backlink].second);
    return roots[backlink].first;
}

static std::vector<PyObject*> findReferenceChain(
    const std::vector<PyObject*>& roots,
    PyObject* goal
) {
    std::set<PyObject*> seen;
    ReferenceList unknownReferrer;
    for (size_t i = 0; i < roots.size(); ++i) {
        unknownReferrer.push_back(std::make_pair<Backlink>(-1, roots[i]));
    }
    std::vector<PyObject*> rv;
    // going to return -1 no matter what: no backlink from roots
    findNextLevel(rv, unknownReferrer, goal, seen);
    return rv;
}

static object findPathToNearestRoot(const object& o) {
    if (!PyList_Check(o.ptr()) || PyList_GET_SIZE(o.ptr()) != 1) {
        PyErr_SetString(PyExc_TypeError, "findNearestRoot must take a list of length 1");
        throw_error_already_set();
    }

    // target = o.pop()
    object target(handle<>(borrowed(PyList_GET_ITEM(o.ptr(), 0))));
    if (-1 == PyList_SetSlice(o.ptr(), 0, 1, 0)) {
        throw_error_already_set();
    }

    object gc_module(handle<>(PyImport_ImportModule("gc")));
    object tracked_objects_list = gc_module.attr("get_objects")();
    // allocating the returned list may have run a GC, but tracked_objects won't be in the list

    std::vector<PyObject*> tracked_objects(len(tracked_objects_list));
    for (size_t i = 0; i < tracked_objects.size(); ++i) {
        object to = tracked_objects_list[i];
        tracked_objects[i] = to.ptr();
    }
    tracked_objects_list = object();

    GCRefs gcrefs;

    // TODO: store allocation/gc count per generation

    for (size_t i = 0; i < tracked_objects.size(); ++i) {
        gcrefs[tracked_objects[i]] = tracked_objects[i]->ob_refcnt;
    }

    for (size_t i = 0; i < tracked_objects.size(); ++i) {
        traverse(tracked_objects[i], subtractKnownReferences, &gcrefs);
    }

    // BFS time

    std::vector<PyObject*> roots;
    for (GCRefs::const_iterator i = gcrefs.begin(); i != gcrefs.end(); ++i) {
        if (i->second && i->first != target.ptr()) { // Don't count the target as a root.
            roots.push_back(i->first);
        }
    }
    std::vector<PyObject*> chain = findReferenceChain(roots, target.ptr());

    // TODO: assert that allocation/gc count per generation didn't change

    list rv;
    for (size_t i = 0; i < chain.size(); ++i) {
        rv.append(object(handle<>(borrowed(chain[i]))));
    }

    return rv;
}
How to Write an Interactive, 60 Hz Desktop Application

By Chad Austin

IMVU’s client application doesn’t fit neatly into a single development paradigm:

  • IMVU is a Windows desktop application. Mouse clicks, window resizes, and dialog boxes must all respond with imperceptible latency. Running IMVU should not significantly affect laptop battery life.
  • IMVU is an interactive 3D game. The 3D scene must be simulated and drawn at smooth, interactive frame rates, 60 Hz if possible.
  • IMVU is a networked application. Sending and receiving network packets must happen quickly and the UI should never have to wait for I/O.

Thus, let us clarify some specific requirements:

  • Minimal CPU usage (and thus battery consumption) when the application is minimized or obscured.
  • Minimal CPU usage in low-complexity scenes. Unlike most games, IMVU must never unnecessarily consume battery life while waiting in spin loops.
  • Animation must continue while modal dialog boxes and menus are visible. You don’t have control over these modal event loops, but it looks terrible if animation pauses while menus and dialogs are visible.
  • Animation must be accurate and precise. It looks much better if every frame takes 22 milliseconds (45 Hz) than if some frames take 30 milliseconds and some take 15 milliseconds (averaging 45 Hz).
  • Animation must degrade gracefully. In a really complex room with a dozen avatars, IMVU can easily spend all of a core’s CPU trying to animate the scene. In this case, the frame rate should gradually drop while the application remains responsive to mouse clicks and other input events.
  • Support for Windows XP, Vista, and 7.

Naive Approach #1

Windows applications typically have a main loop that looks something like:

MSG msg;
while (GetMessage(&msg, 0, 0, 0) > 0) {
    TranslateMessage(&msg);
    DispatchMessage(&msg);
}

What went wrong

Using SetTimer/WM_TIMER sounds like a good idea for simulation and painting, but it’s way too imprecise for interactive applications.

Naive Approach #2

Games typically have a main loop that looks something like the following:

while (running) {
    // process input events
    MSG msg;
    while (PeekMessage(&msg, 0, 0, 0, PM_REMOVE)) {
        TranslateMessage(&msg);
        DispatchMessage(&msg);
    }

    if (frame_interval_has_elapsed) {
        simulate_world();
        paint();
    }
}

What went wrong

The above loop never sleeps, draining the user’s battery and burning her legs.

Clever Approach #1: Standard Event Loop + timeSetEvent

void runMainLoop() {
    MSG msg;
    while (GetMessage(&msg, 0, 0, 0) > 0) {
        TranslateMessage(&msg);
        DispatchMessage(&msg);
    }
}

void customWindowProc(...) {
    if (message == timerMessage) {
        simulate();
        // schedules paint with InvalidateRect
    }
}

void CALLBACK TimerProc(UINT, UINT, DWORD, DWORD, DWORD) {
    if (0 == InterlockedExchange(&inFlight, 1)) {
        PostMessage(frameTimerWindow, timerMessage, 0, 0);
    }
}

void startFrameTimer() {
    RegisterClass(customWindowProc, ...);
    frameTimerWindow = CreateWindow(...);
    timeSetEvent(FRAME_INTERVAL, 0, &TimerProc, 0, TIME_PERIODIC);
}

What went wrong

The main loop’s GetMessage call always returns messages in a priority order. Slightly oversimplified, posted messages come first, then WM_PAINT messages, then WM_TIMER. Since timerMessage is a normal message, it will preempt any scheduled paints. This would be fine for us, since simulations are cheap, but the dealbreaker is that if we fail to maintain frame rate, WM_TIMER messages are entirely starved. This violates our graceful degradation requirement. When frame rate begins to degrade, code dependent on WM_TIMER shouldn’t stop entirely.

Even worse, the modal dialog loop has a freaky historic detail. It waits for the message queue to be empty before displaying modal dialogs. When painting can’t keep up, modal dialogs simply don’t appear.

We tried a bunch of variations, setting flags when stepping or painting, but they all had critical flaws. Some continued to starve timers and dialog boxes and some degraded by ping-ponging between 30 Hz and 15 Hz, which looked terrible.

Clever Approach #2: PostThreadMessage + WM_ENTERIDLE

A standard message loop didn’t seem to be getting us anywhere, so we changed our timeSetEvent callback to PostThreadMessage a custom message to the main loop, who knew how to handle it. Messages sent via PostThreadMessage don’t go to a window, so the event loop needs to process them directly. Since DialogBox and TrackPopupMenu modal loops won’t understand this custom message, we will fall back on a different mechanism.

DialogBox and TrackPopupMenu send WM_ENTERIDLE to their owning windows. Any window in IMVU that can host a dialog box or popup menu handles WM_ENTERIDLE by notifying a global idle handler, which can decide to schedule a new frame immediately or in N milliseconds, depending on how much time has elapsed.

What Went Wrong

So close! In our testing under realistic workloads, timeSetEvent had horrible pauses and jitter. Sometimes the multimedia thread would go 250 ms between notifications. Otherwise, the custom event loop + WM_ENTERIDLE approach seemed sound. I tried timeSetEvent with several flags, but they all had accuracy and precision problems.

What Finally Worked

Finally, we settled on MsgWaitForMultipleObjects with a calculated timeout.

Assuming the existence of a FrameTimeoutCalculator object which returns the number of milliseconds until the next frame:

int runApp() {
    FrameTimeoutCalculator ftc;

    for (;;) {
        const DWORD timeout = ftc.getTimeout();
        DWORD result = (timeout
            ? MsgWaitForMultipleObjects(0, 0, TRUE, timeout, QS_ALLEVENTS)
            : WAIT_TIMEOUT);
        if (result == WAIT_TIMEOUT) {
            simulate();
            ftc.step();
        }

        MSG msg;
        while (PeekMessage(&msg, 0, 0, 0, PM_REMOVE)) {
            if (msg.message == WM_QUIT) {
                return msg.wParam;
            }

            TranslateMessage(&msg);
            DispatchMessage(msg);
        }
    }
}

Well, what about modal dialogs?

Since we rely on a custom message loop to animate 3D scenes, how do we handle standard message loops such as the modal DialogBox and TrackPopupMenu calls? Fortunately, DialogBox and TrackPopupMenu provide us with the hook required to implement frame updates: WM_ENTERIDLE.

When the standard DialogBox and TrackPopupMenu modal message loops go idle, they send their parent window a WM_ENTERIDLE message. Upon receiving WM_ENTERIDLE, the parent window determines whether it’s time to render a new frame. If so, we animate all visible 3D windows, which will trigger a WM_PAINT, which triggers a subsequent WM_ENTERIDLE.

On the other hand, if it’s not time to render a new frame, we call timeSetEvent with TIME_ONESHOT to schedule a frame update in the future.

As we saw previously, timeSetEvent isn’t as reliable as a custom loop using MsgWaitForMultipleObjectsEx, but if a modal dialog or popup menu is visible, the user probably isn’t paying very close attention anyway. All that matters is that the UI remains responsive and animation continues while modal loops are open. Code follows:

LRESULT CALLBACK ModalFrameSchedulerWndProc(HWND hwnd, UINT message, WPARAM wparam, LPARAM lparam) {
    if (message == idleMessage) {
        stepFrame();
    }
    return DefWindowProc(hwnd, message, wparam, lparam);
}

struct AlmostMSG {
    HWND hwnd;
    UINT message;
    WPARAM wparam;
    LPARAM lparam;
};

void CALLBACK timeForPost(UINT, UINT, DWORD_PTR user_data, DWORD_PTR, DWORD_PTR) {
    AlmostMSG* msg = reinterpret_cast<AlmostMSG*>(user_data);
    PostMessage(msg->hwnd, msg->message, msg->wparam, msg->lparam);
    delete msg;
}

void PostMessageIn(DWORD timeout, HWND hwnd, UINT message, WPARAM wparam, LPARAM lparam) {
    if (timeout) {
        AlmostMSG* msg = new AlmostMSG;
        msg->hwnd = hwnd;
        msg->message = message;
        msg->wparam = wparam;
        msg->lparam = lparam;
        timeSetEvent(timeout, 1, timeForPost, reinterpret_cast<DWORD_PTR>(msg), TIME_ONESHOT | TIME_CALLBACK_FUNCTION);
    } else {
        PostMessage(hwnd, message, wparam, lparam);
    }
}

class ModalFrameScheduler : public IFrameListener {
public:
    ModalFrameScheduler() { stepping = false; }

    // Call when WM_ENTERIDLE is received.
    void onIdle() {
        if (!frameListenerWindow) {
            idleMessage = RegisterWindowMessageW(L"IMVU_ScheduleFrame");
            Assert(idleMessage);

            WNDCLASS wc;
            ZeroMemory(&wc, sizeof(wc));
            wc.hInstance = GetModuleHandle(0);
            wc.lpfnWndProc = ModalFrameSchedulerWndProc;
            wc.lpszClassName = L"IMVUModalFrameScheduler";
            RegisterClass(&wc);

            frameListenerWindow = CreateWindowW(
                L"IMVUModalFrameScheduler",
                L"IMVUModalFrameScheduler",
                0, 0, 0, 0, 0, 0, 0,
                GetModuleHandle(0), 0);
            Assert(frameListenerWindow);
        }

        if (!stepping) {
            const unsigned timeout = ftc.getTimeout();
            stepping = true;
            PostMessageIn(timeout, frameListenerWindow, idleMessage, 0, 0);
            ftc.step();
        }
    }
    void step() { stepping = false; }

private:
    bool stepping;
    FrameTimeoutCalculator ftc;
};

How has it worked out?

A custom message loop and WM_ENTERIDLE neatly solves all of the goals we laid out:

  • No unnecessary polling, and thus increased battery life and performace.
  • When possible, the 3D windows animate at 60 Hz.
  • Even degradation. If painting a frame takes 40 ms, the frame rate will drop from 60 Hz to 25 Hz, not from 60 Hz to 15 Hz, as some of the implementations did.
  • Animation continue to play, even while modal dialogs and popup menus are visible.
  • This code runs well on XP, Vista, and Windows 7.

Upcoming Conferences Featuring IMVU’s Development Processes

IMVU engineering and development is being featured at some upcoming conferences.  These are great opportunities to learn more about IMVU and our development processes and scaling a Lean Startup.

SCALING WITH CONTINUOUS DEPLOYMENT

Web 2.0 Expo, New York, NY, September 29, 2010

http://www.web2expo.com/webexny2010/public/schedule/detail/15825

Continuous Deployment takes continuous integration one step further, where every commit goes live to production servers. When this process is described it is frequently met with skepticism around site reliability and the ability to scale a business this way, but at IMVU it works, it scales (with challenges) and it is embraced by the entire organization. Continuous Deployment offers a substantial advantage, providing the ability to quickly react to new business opportunities. At IMVU the time from an engineer committing code to it being live on the production cluster is approximately 20 minutes. Every commit is pushed live with no interim staging or QA deployment. Success with this system requires both a sophisticated automated testing system and a fail-safe monitoring system that can detect a regression and revert it before it has material customer impact. IMVU adopted this continuous deployment system well after launch, requiring changes to processes, systems and culture. Examples are provided for all components of this system, how IMVU succeeded in the transition and the new challenges faced as the system scales with the organization.

SCALING PRODUCT DEVELOPMENT AT A LEAN STARTUP: AGILE AT IMVU

GDC Online, Austin, TX, October 6, 2010

http://schedule.gdconline.com/session/11330

IMVU is sometimes referred to as the original ‘Lean Startup’, having successfully blended Agile methodologies with Customer Development methodologies. This lecture focuses on IMVUs product development process, and the hard won learning which has allowed it to evolve and scale with company growth. Topics include foundations for successful Scrum implementation in the organization, specific Agile methodologies used and why, detailed description of the Scrum team calendar and planning process, and how IMVU uses retrospectives, post-mortems, and ‘5 Whys’ to continuously evolve the product development process and ensure Engineering delivers successfully for customers and the Product Management organization.

BUILDING A SUCCESSFUL BUSINESS AFTER LAUNCH THROUGH RAPID ITERATION

GDC Online, Austin, TX, October 7, 2010

http://schedule.gdconline.com/session/11329

Online games, social applications and virtual worlds don’t stop development after launch. Understanding customer behavior and iterating on your product is critical to growing your business, so achieving a process that decreases this iteration time greatly improves your chance of success. By creating systems that utilize A/B testing, instant customer metrics and a sophisticated deployment process IMVU is able to shorten this iteration loop and deploy new software to production up to 50 times per day. This session demonstrates real-world examples of these systems and explains a process for deploying them, even after launch.

MAKING MONEY ON VIRTUAL GOODS: THE IMVU EXPERIENCE

GDC Online, Austin, TX, October 6, 2010

http://schedule.gdconline.com/session/11552

During this presentation, IMVUs Lee Clancy, SVP of Product Management and GM of Direct Revenue will demonstrate how MMO developers can leverage the company’s expertise to create a successful virtual goods business. By providing insight into the strategy IMVU used to grow its user base to more than 40 million registered users and its digital catalog (the worlds largest) to more than four million virtual goods, MMO developers will learn how they too can develop a virtual goods business that will help them further monetize their user base. The presentation will also help the audience understand the similarities between social entertainment networks and MMOs so they can see how applying IMVUs business strategies can help grow their businesses.

Extracting Color and Transparency from Flash

By Chad Austin

For clarity, I slightly oversimplified my previous discussion on efficiently rendering Flash in a 3D scene. The sticky bit is extracting transparency information from the Flash framebuffer so we can composite the overlay into the scene.

Flash does not give you direct access to its framebuffer. It does, with IViewObject::Draw, allow you to composite the Flash framebuffer onto a DIB section of your choice.

Remembering your Porter-Duff, composition of source over dest is:

Color = SourceColor * SourceAlpha + DestColor * (1 – SourceAlpha)

If the source color is premultiplied, you get:

Color = SourceColor + DestColor * (1 - SourceAlpha)

Assuming we want premultiplied color and alpha from Flash for efficient rendering in the 3D scene, applying the above requires solving for FlashAlpha and FlashColor:

RenderedColor = FlashColor * FlashAlpha + DestColor * (1 - FlashAlpha)

RenderedColor = FlashColor * FlashAlpha + DestColor - DestColor * FlashAlpha

RenderedColor - DestColor = FlashColor * FlashAlpha - DestColor * FlashAlpha

RenderedColor - DestColor = FlashAlpha * (FlashColor - DestColor)

FlashAlpha = (RenderedColor - DestColor) / (FlashColor - DestColor)

If FlashColor and DestColor are equal, then FlashAlpha is undefined. Intuitively, this makes sense. If you render a translucent black SWF on a black background, you can’t know the transparency data because all of the pixels are still black. This doesn’t matter, as I’ll show in a moment.

FlashColor is trivial:

RenderedColor = FlashColor * FlashAlpha + DestColor * (1 - FlashAlpha)

RenderedColor - DestColor * (1 - FlashAlpha) = FlashColor * FlashAlpha

FlashColor = (RenderedColor - DestColor * (1 - FlashAlpha)) / FlashAlpha

FlashColor is undefined if FlashAlpha is 0. Transparency has no color.

What do these equations give us? We know RenderedColor, since it’s the result of calling IViewObject::Draw. We have control over DestColor, since we configure the DIB Flash is drawn atop. What happens if we set DestColor to black (0)?

FlashColor = (RenderedColorOnBlack) / FlashAlpha

What happens if we set it to white (1)?

FlashColor = (RenderedColorOnWhite - (1 - FlashAlpha)) / FlashAlpha

Now we’re getting somewhere! Since FlashColor and FlashAlpha are constant, we can define a relationship between FlashAlpha and RenderedColorOnBlack and RenderedColorOnWhite:

(RenderedColorOnBlack) / FlashAlpha = (RenderedColorOnWhite - (1 - FlashAlpha)) / FlashAlpha

RenderedColorOnBlack = RenderedColorOnWhite - 1 + FlashAlpha

FlashAlpha = RenderedColorOnBlack - RenderedColorOnWhite + 1

FlashAlpha = RenderedColorOnWhite - RenderedColorOnBlack

So all we have to do is render the SWF on a white background and a black background and subtract the two to extract the alpha channel.

Now what about color? Just plug the calculated FlashAlpha into the following when rendering on black.

FlashColor = (RenderedColor - DestColor * (1 - FlashAlpha)) / FlashAlpha

FlashColor = RenderedColorOnBlack / FlashAlpha

Since we want premultiplied alpha:

FlashColor = RenderedColorOnBlack

Now that we know FlashColor and FlashAlpha for the overlay, we can copy it into a texture and render the scene!

Efficiently Rendering Flash in a 3D Scene

By Chad Austin

In my previous post, I talked about how to embed Flash into your desktop application, for UI flexibility and development speed. This time, I’ll discuss efficient rendering into a 3D scene.

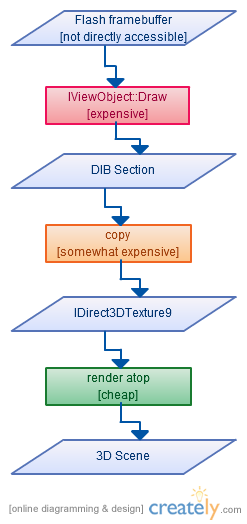
Rendering Flash as a 3D Overlay (The Naive Way)

At first blush, rendering Flash on top of a 3D scene sounds easy. Every frame:

  1. Create a DIB section the size of your 3D viewport
  2. Render Flash into the DIB section with IViewObject::Draw
  3. Copy the DIB section into an IDirect3DTexture9
  4. Render the texture on the top of the scene

Ta da! But your frame rate dropped to 2 frames per second? Ouch. It turns out this implementation is horribly slow. There are a couple reasons.

First, asking the Adobe flash player to render into a DIB isn’t a cheap operation. In our measurements, drawing even a simple SWF takes on the order of 10 milliseconds. Since most UI doesn’t animate every frame, we should be able to cache the captured framebuffer.

Second, main memory and graphics memory are on different components in your computer. You want to avoid wasting time and bus traffic by unnecessarily copying data from the CPU to the GPU every frame. If only the lower-right corner of a SWF changes, we should limit our memory copies to that region.

Third, modern GPUs are fast, but not everyone has them. Let’s say you have a giant mostly-empty SWF and want to render it on top of your 3D scene. On slower GPUs, it would be ideal if you could limit your texture draws to the region of the screen that are non-transparent.

Rendering Flash as a 3D Overlay (The Fast Way)

Disclaimer: I can’t take credit for these algorithms. They were jointly developed over years by many smart engineers at IMVU.

First, let’s reduce an embedded Flash player to its principles:

  • Flash exposes an IShockwaveFlash [link] interface through which you can load and play movies.
  • Flash maintains its own frame buffer. You can read these pixels with IViewObject::Draw.
  • When a SWF updates regions of the frame buffer, it notifies you through IOleInPlaceSiteWindowless::InvalidateRect.

In addition, we’d like the Flash overlay system to fit within these performance constraints:

  • Each SWF is rendered over the entire window. For example, implementing a ball that bounces around the screen or a draggable UI component should not require any special IMVU APIs.
  • If a SWF is not animating, we do not copy its pixels to the GPU every frame.
  • We do not render the overlay in transparent regions. That is, if no Flash content is visible, rendering is free.
  • Memory consumption (ignoring memory used by individual SWFs) for the overlay usage is O(framebuffer), not O(framebuffer * SWFs). That is, loading three SWFs should not require allocation of three screen-sized textures.
  • If Flash notifies of multiple changed regions per frame, only call IViewObject::Draw once.

Without further ado, let’s look at the fast algorithm:

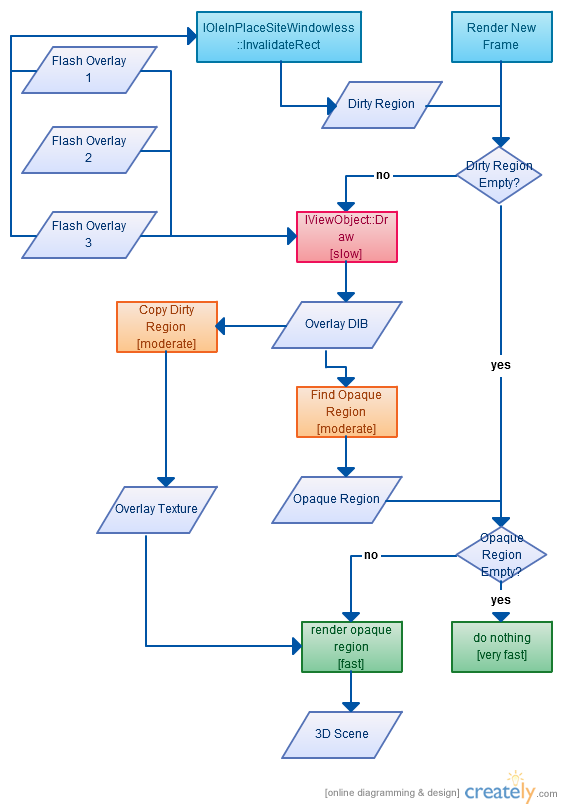
Flash notifies us of visual changes via IOleInPlaceSiteWindowless::InvalidateRect. We take any updated rectangles and add them to a per-frame dirty region. When it’s time to render a frame, there are four possibilities:

  • The dirty region is empty and the opaque region is empty. This case is basically free, because nothing need be drawn.
  • The dirty region is empty and the opaque region is nonempty. In this case, we just need to render our cached textures for the non-opaque regions of the screen. This case is the most common. Since a video memory blit is fast, there’s not much we could do to further speed it up.
  • The dirty region is nonempty. We must IViewObject::Draw into our Overlay DIB, with one tricky bit. Since we’re only storing one overlay texture, we need to render each loaded Flash overlay SWF into the DIB, not just the one that changed. Imagine an animating SWF underneath another translucent SWF. The top SWF must be composited with the bottom SWF’s updates. After rendering each SWF, we scan the updated DIB for a minimalish opaque region. Why not just render the dirty region? Imagine a SWF with a bouncing ball. If we naively rendered every dirty rectangle, eventually we’d be rendering the entire screen. Scanning for minimal opaque regions enables recalculation of what’s actually visible.
  • The dirty region is nonempty, but the updated pixels are all transparent. If this occurs, we no longer need to render anything at all until Flash content reappears.

This algorithm has proven efficient. It supports multiple overlapping SWFs while minimizing memory consumption and CPU/GPU draw calls per frame. Until recently, we used Flash for several of our UI components, giving us a standard toolchain and a great deal of flexibility. Flash was the bridge that took us from the dark ages of C++ UI code to UI on which we could actually iterate.

How to Embed Flash Into Your 3D Application

By Chad Austin

Writing user interfaces is hard. Writing usable interfaces is harder. Yet, the design of your interface is your product.

Products are living entities. They always want to grow, adapting to their users as users adapt to them. In that light, why build your user interface in a static technology like C++ or Java? It won’t be perfect the first time you build it, so prepare for change.

IMVU employs two technologies for rapidly iterating on and refining our client UIs: Flash and Gecko/HTML. Sure, integrating these technologies has a sizable up-front cost, but the iteration speed they provide easily pays for them.

Rapid iteration has some obvious benefits:

  1. reduces development cost
  2. reduces time to market

and some less-obvious benefits:

  1. better product/market fit: when you can change your UI, you will.
  2. improved product quality: little details distinguish mediocre products from great products. make changing details cheap and your Pinto will become a Cadillac.
  3. improved morale: both engineers and designers love watching their creations appear on the screen right before them. it’s why so many programmers create games!

I will show you how integrating Flash into a 3D application is easier than it sounds.

Should I use Adobe Flash or Scaleform GFx?

The two most common Flash implementations are Adobe’s ActiveX control (which has a 97% installed base!) and Scaleform GFx.

Adobe’s control has perfect compatibility with their tool chain (go figure!) but is closed-source and good luck getting help from Adobe.

Scaleform GFx is an alternate implementation of Flash designed to be embedded in 3D applications, but, last I checked, is not efficient on machines without GPUs. (Disclaimer: this information is two years old, so I encourage you to make your own evaluation.)

IMVU chose to embed Adobe’s player.

Deploying the Flash Runtime

Assuming you’re using Adobe’s Flash player, how will you deploy their runtime? Well, given Flash’s install base, you can get away with loading the Flash player already installed on the user’s computer. If they don’t have Flash, just require that they install it from your download page. Simple and easy.

Down the road, when Flash version incompatibilities and that last 5% of your possible market becomes important, you can request permission from Adobe to deploy the Flash player with your application.

Displaying SWFs

IMVU displays Flash in two contexts: traditional HWND windows and 2D overlays atop the 3D scene.

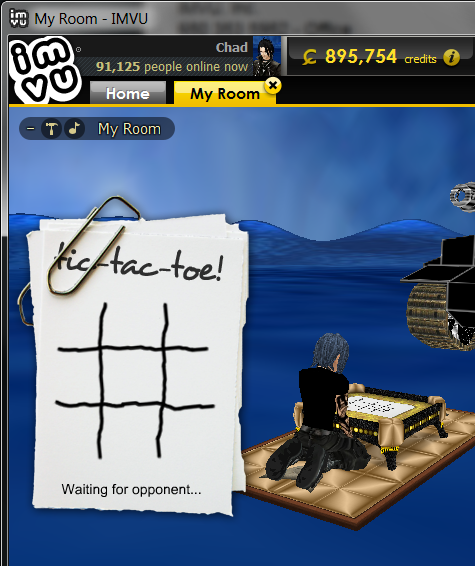
If you want to have something up and running in a day, buy f_in_box. Besides its awesome name, it’s cheap, comes with source code, and the support forums are fantastic. It’s a perfect way to bootstrap. After a weekend of playing with f_in_box, Dusty and I had a YouTube video playing in a texture on top of our 3D scene.

Once you run into f_in_box’s limitations, you can use the IShockwaveFlash and IOleInPlaceObjectWindowless COM interfaces directly. See Igor Makarav’s excellent tutorial and CFlashWnd class.

Rendering Flash as an HWND

For top-level UI elements use f_in_box or CFlashWnd directly. They’re perfectly suited for this. Seriously, it’s just a few lines of code. Look at their samples and go.

Rendering Flash as a 3D Overlay

Rendering Flash to a 3D window gets a bit tricky… Check out my next post!

Agile Business Intelligence: A Core Component of Agile Engineering

By Curtis Pullen

Business intelligence (BI) is not a term that is frequently brought up in the context of agile development – it seems more appropriate in the context of big, slowly moving companies crunching data on million dollar mainframes. The truth, however, is that business intelligence is a critical and integral part of the agile product development process. The goal of agile is to enable teams to react to feedback, and the goal of business intelligence is to provide that feedback.

Business intelligence in the traditional sense is unfortunately not equipped to provide the kind of feedback that an agile engineering team needs. When multiple teams of engineers are iterating in two or three week sprints, continuously deploying their changes to a production system as we do at IMVU, BI needs to be even faster. Those engineers are inventing new dimensions of potential analysis at an explosive rate and transforming user behaviour so quickly that data more than a few months old is of only archaeological interest, and to maintain that pace they need continuous feedback. They need to know when a mistake has been made so they can fix it; they need to know when they’re on to something revolutionary so they can run with it. They need BI that’s as agile as they are.

So what does agile BI look like? It employs many of the same patterns as agile software development: quick iteration, frequent releases, and close communication. While a feature is under development, BI analysts meet with product management to identify the high-level metrics that will best indicate the status of the project post-release, and with engineers, to determine how that data might best be obtained. When a project ships, BI analysts aggregate the data, translate it into meaningful information, present it, and seek feedback. Any questions or concerns raised by engineering or management trigger a new round of the cycle:

1. Discuss requirements with stakeholders.

2. Collect and interpret data

3. Deliver results to stakeholders and collect feedback

In order for this to succeed, BI needs to be tightly linked to both engineering and management. At IMVU, we accomplish this by having our engineers take on most of our BI work as an integral part of product development, while more sophisticated analysis is undertaken by a BI team with engineering support. We collect the right data exactly when we need it, we don’t waste time scrutinizing obvious patterns, and we illuminate the details as soon as it’s necessary.

Life moves fast, business intelligence should too.

This is an expanded version of some thoughts I put down in a contest for how best to describe agile BI. You can read the entries and then vote for mine here: http://www.pentaho.com/what_is_agile

IMVU’s Startup Lessons Learned Conference Presentation

By Brett Durrett

IMVU presented at the Startup Lessons Learned Conference in San Francisco on April 23rd, 2010.  The event highlighted several companies that are being built using the “Lean Startup” framework created by Eric Ries, IMVU’s former CTO, largely based on his experiences at IMVU.

The conference was great and I had the opportunity to meet many smart entrepreneurs trying to build businesses out of great ideas.  I heard many stories about the challenges early startups encounter and could remember when IMVU was in that stage. I also talked to some people from companies that are now considered “big and successful” and heard a few comments along the lines of “been there, barely survived that”.

At the conference I had the realization that IMVU as a business is not exactly a “startup” anymore.   The goal of an early startup is discovering the right product and achieving a sustainable business model.  IMVU has been successful at this and is now all about building a growing, enduring business that is a high value for our customers and employees.  Though we still feel like a startup in many ways and hold onto the lean principles that proved to be so valuable, we now have new challenges to address that are typically not considered startup challenges.

A successful startup grows into a bigger business.  At IMVU, we heavily invest in our company so we can get more people working on features that delight our customers and build up the business.   With more people many of the ways you used to work don’t work anymore. For example, frequent meetings to get feedback from everybody in the company can work when you have fewer than 15 people… when you get to 50+ people this becomes a very expensive meeting. The overhead of making sure everyone in the meeting has background data and context to make an informed decision simply does not scale.  Joel Spolsky explained this well and provides good examples in his article, “A Little Less Conversation”.

There are a whole range of challenges in these transitions, from process to culture and all have to be accommodated as a company grows. At the conference I was approached by several people that had gone through the same experience, some successfully, some not.  I hope that some of what IMVU shared will help others to learn from our experience and allow more people to fall into the successful category.

Check out IMVU’s video presentation available at http://bit.ly/bBpUcm

If you just want to review the slides without audio, they are here: http://bit.ly/aGXqcY

[slideshare id=3861498&doc=sll2010-doesitscale-100426135956-phpapp02]

IMVU’s Agile Engineering Process

Clinton Keith, the Agile coach and trainer who introduced Agile and scrum to the video game industry in 2003, visited the IMVU offices during the Game Developer’s Conference in March. I spent time with Clint describing IMVU’s product development process, and we even had the opportunity to show Clint some of our scrum process in action. Clint reported a lot of interest in our successful implementation of Agile and Lean Startup methodologies from people he spoke with at GDC, and he asked if I’d be willing to do a Q&A session with him. Here is an excerpt of our interview, posted today on his Agile Game Development blog:


Agile Game Interview – Agile Engineering for Online Communities

CK: What is the overview of the IMVU engineering process?

JB: Our engineering team practices what people refer to as “Agile” or “Lean Startup” methodologies, including Test-Driven Development (TDD), pair programming, collective code ownership, and continuous integration. We refactor code relentlessly, and try to ship code in small batches. And we’ve taken continuous integration a step further: every time we check in server side code, we push the changes to our production servers immediately after the code passes our automated tests. In practice, this means we push code live to our production web servers 35-50 times per day. Taken together with our A/B split-testing framework, which we use to collect data to inform our product development decisions, we have the ability to quickly see and test the effects of new features live in production. We also practice “5 Whys” root cause analysis when something goes wrong, to avoid making the same mistakes twice.

CK: How do you get so many changes out in front of customers without causing problems, either for your customers or your production web servers?

JB: I think it’s important to point out that sometimes we actually do introduce regressions and new bugs that impact our customers.  However, we try to strike a balance between minimizing negative customer impacts and maximizing our ability to innovate and test new features with real customers as early as possible. We have several mechanisms we use to help us do that, and to control how customers experience our changes. It boils down to automation on one hand, and our QA engineers on the other.

First the automation: we take TDD very seriously, and it’s an important part of our engineering culture. We try to write tests for all of our code, and when we fix bugs, we write tests to ensure they don’t regress. Next, we built our code deployment process to include what we call our “cluster immune system,” which monitors and alerts on statistically significant changes in dozens of key error rates and business metrics. If a problem is detected, the code is automatically rolled back and our engineering and operations teams are notified. Next, we have the ability to limit rollout of a feature to one or more groups of customers–so we can expose new features to only QA or Admin users, or ad-hoc customer sets. We also built an incremental rollout function that allows us to slowly increase exposure to customers while we monitor both technical and business metrics to ensure there are no big problems with how the features work in production. Finally, we build in a “kill switch” to most of our applications, so that if any problems occur later, for example, scaling issues, we have fine-grained control to turn off problematic features while we fix them.


Read the rest of Agile Game Interview – Agile Engineering for Online Communities

IMVU’s Approach to Integrating Quality Assurance with Continuous Deployment

We’ve heard a lot of interest from folks we’ve talked to in the tech community and at conferences about our Continuous Deployment process at IMVU, and how we push code up to 50 times a day. We’ve also received some questions about how we do this without introducing regressions and new bugs into our product, and how we approach Quality Assurance in this fast-paced environment.

The reality is that we occasionally do negatively impact customers due to our high velocity and drive to deliver features to our customers and to learn from them. Sometimes we impact them by delivering a feature that isn’t valuable, and sometimes we introduce regressions or new bugs into our production environment.

But we’ve delivered features our customers didn’t like even when we were moving more slowly and carefully—and it was actually more costly because it took us longer to learn and change our direction. For example, we once spent more than a month of development time working on a feature called Updates–similar to the Facebook “friend feed”, and we guessed wrong–way wrong–about how our customers would use that feature.  It took us a way too long to ship a feature nobody actually wanted, and the result was that we delayed delivery of a feature that our customers were dying to have: Groups.

Asking customers what they want takes guesswork and internal employee opinions out of product development decisions, making it easy to resolve questions such as, “Should we build tools to let users categorize their avatar outfits, or should we build a search tool, or both?”  We make the best decisions we can based on available customer data, competitive analysis, and our combined experience and insights—then build our features as quickly as possible to test them with customers to see if we were right.

We’ve found that the costs we incur–typically bugs or unpolished but functional features–are worthwhile in the name of getting feedback from our customers as quickly as possible about our product innovations. The sooner we have feedback from our customers, the sooner we know whether we guessed right about our product decisions and the sooner we can choose to either change course or double down on a winning idea.

Does that mean we don’t worry about delivering high quality features to customers or interrupting their experience with our product? Nothing could be further from the truth.

For starters, we put a strong emphasis on automated testing. This focus on testing and the framework that supports it is key to how we’ve structured our QA team and the approach they take. Our former CTO and IMVU co-founder Eric Ries has described in detail the infrastructure we use to support Continuous Deployment, but to summarize, we have implemented:

  • A continuous integration server (Buildbot) to run and monitor our automated tests with every code commit
  • A source control commit check to stop new code being added to the codebase when something is broke
  • A script to safely deploy software to our cluster while ensuring nothing goes wrong. We wrote a cluster immune system to monitor and alert on statistically significant regressions, and automatically revert the commit if an error occurs)
  • Real-time monitoring and alerting to inform the team immediately when a bug makes in through our deployment process
  • Root cause analysis (Five Whys) to drive incremental improvements in our deployment and product development processes

This framework and our commitment to automated testing means that software engineers write tests for everything we code. We don’t have a specialized role that focuses solely on writing tests and infrastructure–that work is done by the entire engineering team. This is one factor which has allowed us to keep our QA team small. But you can’t catch all regressions or prevent all bugs with automated tests. Some customer use cases and some edge cases are too complex to test with automation. Living, breathing, intelligent people are still superior at doing multi-dimensional, multi-layered testing. Our QA Engineers leverage their insight and experience to find potential problems on more realistic terms, using and testing features in the same ways real customers might use them.

Our QA Engineers spend at least half their time manually testing features. When we find test cases that can be automated, we add test coverage (and we have a step in our Scrum process to help ensure we catch these). We also have a Scrum process step that requires engineers to demonstrate their features to another team member–essentially, doing some basic manual testing with witnesses present to observe. Since we have far more features being built than our QA Engineers have time to test, it also forces the team to make trade-offs and answer the question, “What features will benefit most from having QA time?” Sometimes this isn’t easy to answer, and it forces our teams to consider having other members of the team, or even the entire company, participate in larger, organized testing sessions. When we think it makes sense, our QA Engineers organize and run these test sessions, helping the team to find and triage lots of issues quickly.

Our QA Engineers also have two more important responsibilities. The first is a crucial part our Scrum planning process, by writing test plans and reviewing them with product owners and technical leads. They help ensure that important customer use cases are not missed, and that the engineering team understands how features will be tested. Put another way, our QA engineers help the rest of the team consider how our customers might use the features they are building.

The second responsibility is what you might expect of QA Engineers working in an Agile environment: they work directly with software engineers during feature development, testing in-progress features as much as possible and discussing those features face-to-face with the team. By the time features are actually “ready for QA”, they have usually been used and tested at some level already, and many potential bugs have already been found and fixed.

Regardless of how much manual testing is completed by the team before releasing a feature, we rely again on automation: our infrastructure allows us to do a controlled rollout live to production, and our Cluster Immune System monitors for regressions, reducing the risk of negatively impacting customers.

Finally, once our features are live in front of customers, we watch for the results of experiments we’ve set up using our A/B split-test system, and listen for feedback coming in through our community management and customer service teams. As the feedback starts rolling in—usually immediately, we’re ready. We’ve already set aside engineering time specifically to react quickly if bugs and issues are reported, or if we need to tweak features to make them more fun or useful for customers.

We’re definitely not perfect: with constrained QA resources and a persistent drive by the team to deliver value to customers quickly, we do often ship bugs into production or deliver features that are imperfect. The great thing is that we know right away what our customers want us to do about it, and we keep on iterating.